


- Start Windows Explorer, Windows NT Explorer, My Computer.
- Role the right mouse button to snap the drive containing the floppy disk you wish to format, and then click Format on the menu that appears.
- In the Format dialog box, click the choices you desire to use to format the disk, and then click Start.
Options that are available:
This will depend on the floppy disk that we are formatting, most disks are now 1.44Mb, it is best to exit this choice as it is.
FAT or NTFS, FAT is the natural file system for floppies, nevertheless if you take a utility set up to enable NTFS floppies so choose NTFS, if you are uncertain or FAT is the only alternative then just leave it on FAT.
Allocation Unit Size: This should be left on the default unless you have a reason to switch it.
Volume Label: This is where you can enter a label for your floppy disk, merely typewrite the name into the box, in our case we have called the disk New Disk.
Quick Format: This alternative can be selected if the disk takes antecedently been formatted and you just want to free the data away the disc.
Make an MS-DOS startup disk: This choice can be applied to copy system files over to produce a bootable system disk .
When you have chosen the options that you wish merely click on the Start button.
After snapping Start you will be given a warning informing you that every data on the floppy disk will be deleted, assuming on that point is no data on the floppy that you demand click ok.
Later clicking OK you will see a progress bar and that will be followed by an alert making knowns you about the condition of the format, ie whether it was prosperous or not.
If you desire to format another floppy disk then enter a different volume label and then click the Start button in the format dialog box over again.
When finished click Close button.Your floppy disk is now formatted and can be used to stock your files.
Tampilkan postingan dengan label Computer. Tampilkan semua postingan
Tampilkan postingan dengan label Computer. Tampilkan semua postingan
Senin, 28 Maret 2011
Sabtu, 19 Maret 2011
Pidgin - Multiple Instant Messenger Service
If like me, you find yourself juggling multiple messenger applications to keep your friends, family and colleagues happy you will be glad to hear about Pidgin. Formally known as Gaim, Pidgin is an open-source messaging program that allows the simultaneous use of multiple instant messenger services through one application.
Available as a free of charge download from www.pidgin.im, this small program supports 17 networks including favourites AOL, MSN and Yahoo as well some lesser known ones such as Jabber and Gadu-Gadu. Additional chat clients such as Skype and the Facebook Chat tool can be added through the use of freely available third party plugins which are easily located on the Pidgin site.
Once installed, simply select the type of account you want to add (for example a Google Talk account) along with your user name and password. Any of your contacts from that account that are currently online will automatically appear in the buddies list and you can begin chatting straight away. Not only does this offer the distinct advantage that you don’t need to switch between several applications if you have contact with friends on multiple networks but it also cuts down on the resource requirements of having multiple chat services running on one machine.
Along with being cross compatible with different networks, the Pidgin application is also available for many different Operating Systems; as well as the obvious Windows version, the developers have provided support for Solaris, SkyOS, Qtopia, UNIX, Linux and even the AmigaOS.
All the standard features you would come to expect such as contact organiser, custom smileys, file transfers and group chats are present. The only slight criticism that I would have is that it doesn’t support video and voice chat however my assumption is that these protocols are difficult to integrate in to an application that has been designed to be compatible with dozens of networks and half a dozen different Operating Systems. Hopefully this lack of functionality will be addressed in future releases.
Pidgin is completely customisable; the preferences dialog box provides an area where you can define every conceivable option including the interface, sounds, network connection, chat logging and your default availability status. In terms of appearance you can also change the font type, size and colour, formatting along with installing new themes which change the appearance of smileys and status icons. An additional option to install themes in order to change the actual user interface would be welcome as the default interface may be a little dull and unintuitive for some users
Microsoft Office 2010
Despite it being the second most used application on my work computer (behind the Mozilla Firefox browser), it’s still impossible for me to get excited about a new edition of the Microsoft Office suite.
With the final release due in a couple of months, Microsoft have provided a beta test version of Office 2010 that’s free for members of the public to download. The beta test version will run unhindered until October 2010 at which point users must decide whether they wish to purchase the final release or have it removed from their hard drive.
For the costs involved the majority of home users may still be better off with the free OpenOffice Suite (www.openoffice.org) as it should provide all the features you are likely to need at no cost. This having been said, the Office Suite has remained a popular flagship product over the years due to business users often requiring a specific function or application only present in the Microsoft offering. I, for example, use Outlook on a regular basis and haven’t yet found an alternative that suits my needs.
Having not been the biggest fan of Office 2007 (especially the ‘ribbon’ interface discussed in the past) I wasted no time downloading the 64-bit professional version of the beta to put it through its paces. I have now been using it for a couple of days it does appear notably faster than Office 2007 and certainty incredibly stable. The speed increase could easily be attributed to the fact that a 64-bit version of the application is now available to run on modern 64-bit computers.
Office Professional 2010 includes Word, Excel, PowerPoint, InfoPath, OneNote, Outlook, Access and Publisher. The home edition (also currently available in beta) includes Word, Excel, PowerPoint, Outlook and OneNote. After the official release, computer manufacturers may choose to bundle new machines with a starter edition of Office which includes just Excel and Word; this version of Office will replace the aging Microsoft Works Suite.
Although the ribbon interface remains, it is certainly a lot clearer than that provided with Office 2007; the confusing Office orb has been replaced with the familiar file menu, there are fewer distracting borders, a neutral colour scheme and most importantly it is customisable to the users individual tastes. The applications look and behave like a ‘family’ now and have become more intuitive to use as a result of the more refined user interface.
An important new feature due for release in the final version but missing from the beta is the ‘Web Apps’ which will extend the Office functionality to a compatible web browser. Very similar in form to Google Docs, Office Web Apps allows users to collaborate, edit and share Office documents online. This is an incredibly important new feature that has no doubt come about due to the success of Google Docs and one that I would like to field test when complete.
This article isn’t long enough to go in to details about minor new features so I will summarise by observing that the changes made from Office 2007 to Office 2010 are evolutionary rather than revolutionary; very much in the same way that Windows 7 was an evolutionary change compared with Vista. Excluding the Web Apps there is nothing substantially new however the minor improvements are certainly welcome as is the chance to road test a new piece of software completely free of charge for a year.
Users interested in downloading the beta version of Office 2010 should visit www.microsoft.com/office/2010 to get their hands on a copy.
Kamis, 10 Maret 2011
Install registry cleaner – speed up your windows system
With Registry Mechanic you can safely clean, repair and optimize the Windows® registry with a few simple mouse clicks! Problems with the Windows® registry are a common cause of Windows® crashes, slow performance and error messages. By using a registry cleaner regularly and fixing registry errors your system should not only be more stable but it will also help improve your system performance without expensive hardware upgrades.

With a few easy steps our registry cleaner will scan your entire registry for any invalid entries and provides a list of the registry errors found, you can then choose to selectively clean each item or automatically repair them all. For your convenience and protection Registry Mechanic can also make a backup of any repairs made so that you can easily recover any changes if required.
Some facts about Registry Mechanic
- World’s most popular registry cleaner with over 60 million downloads.
- Recommended by experts and editors as the world’s best registry cleaner.
- Clean the registry to fix Windows errors and crashes.
- Registry defrag to optimize your PC for better performance.
- FREE customer support for all users.
- Easy to use. Designed for both expert and novice users.
How to Format and Reinstall Windows XP
Tip: Click the images to enlarge.
Step 1- Installation CD Insert your Windows XP installation disc into your CD or DVD drive.
Step 2 – Restart your computer and start Windows setup using Microsoft Windows bootable XP disk

Tutorial 2: Press any key to boot from CD
Step 3 – System Loading

Tutorial 3: Windows setup is loading files
Step 4 – Accept Windows usage agreement

Tutorial 4: Press F8 to accept microsoft licence agreement
Step 5 – Setup start

Tutorial 5: Press enter to start the windows installation
Step 6 – Delete old partition and format

Tutorial 6: Delete existing partition "C"

Tutorial 6.1: Confirm deleting of partition - press " D "

Tutorial 6.2: Confirm the deleting by pressing " L "
Step 7 – Create installation partition

Tutorial 7: Select unpartitioned space and press " C "
Step 8 – Format the computer (the hard disk)

Tutorial 8: Select format using NTFS (Quick) and hit Enter
Step 9 – Start Windows XP Setup Setup will start to and will auto-format the “C:” partition, and start with Windows XP installation. From here you are all set and the installation of Windows will proceed. This will take a while. The computer will reboot several times, and will continue with installation. Don’t remove the Windows XP setup CD, and don’t press a key when prompted (we already did that).

Tutorial 9: Setup is formatting

Tutorial 9.2: Setup reboots

Tutorial 9.1: Copying files needed for windows setup
How to format and Reinstall Windows Vista
In this tutorial we will be installing clean version of Windows Vista.
Usually people format windows vista in try to fix their system, repair some functionality or upgrade from windows XP.
Recommended: If you are not sure about your computer hardware compatibility with Windows Vista, get this Upgrade Advisor and check your system compatibility. Next make sure that you have the Drivers CD (that came when you’ve purchased your PC), or if you don’t have them, download the latest Vista drivers for your hardware (you can find them at the support section of your hardware manufacturer, remember to save them to different partition than “C:” (don’t save them in MyDocuments folder, it will get deleted with the formatting), safest way is to store them in other partition than C: (ex. D: , E: , removable drive like USB or burn them on a CD/DVD)
Now after you are sure that your PC is compatible with Vista, and you have all the drivers saved, you can proceed with Formatting Windows Vista.
Step 1. Insert your Windows Vista DVD. The DVD is bootable so after you restart your PC (with the DVD inside) the Windows Vista Setup will begin loading ( if the setup doesn’t start automatically, make another restart and press F2, or F8 after the boot screen and select boot from DVD ).
Step 2. The first screen of the Format Windows Vista sequence will show up. At this point you need to select your Language and Time and currency format (click the image to enlarge). Press Next.


Scenario 1: If you don’t have your product key, you can skip this step and at the next step you will be asked to pick Vista Package that you want to install : Vista Home Basic, Home Premium, Business, Ultimate. If you install windows vista without providing product key, after 14 days you will have to enter a valid product key, or if you don’t, you’ll be forced to format windows vista again. This is good if you want to test which windows vista version is best for you, before your purchase.
Scenario 2: You enter your product key (keep it handy!), and at the next screen your purchased version will be auto-recognized.


Scenario 1: If you already have another operating system installed (ex. Windows XP) you will have the Upgrade option enabled. It’s up to you to decide if you prefer “clean” install or upgrading from previous Windows Installation. Clean install is recommended for improving system performance, and Upgrade Setup is recommended if you have some files in your C: , My Documents, or Desktop folders that you don’t want deleted.
Scenario 2: You already have operating system installed but you want to format your drive, deleting the old system and installing fresh Windows Vista copy. In that case select the C: drive and press Format ( don’t format all drives! only the primary where we are installing Windows Vista – ” C: “. The setup will do the rest.


Step 11. Installing Windows Vista finishes, insert your User Name and Password here.


Step 17. You now need to install some drivers that the system will not install automatically.
Thats it! You’ve finished installing Windows Vista.
how to format the Windows 7
Windows 7 is far better than previous windows versions (XP and Vista). The install process is plain simple and easy to follow. Big Bravo! for Microsoft for this. Now, just follow these steps and you will install windows 7 in no time You can Install Windows 7 via DVD Disk you’ve purchased or with bootable USB.
This post explains installing windows 7 with dvd disk.
- 31 steps total, every step is screen-captured
First, insert your Windows 7 Boot Disk into your dvd drive and reboot your PC
While the PC is rebooting, you will be prompted ” Press any key to boot from CD…” Just press any key here


If you want to format the partition, go to Drive options

click format and then yes


 Install Windows 7 - Setup Restarts

 Install Windows 7 - Windows starts to load
 Install Windows 7 - loading...
 Install Windows 7 - Completing Installation

Insert your name (this will be your windows username)


This post explains installing windows 7 with dvd disk.
- 31 steps total, every step is screen-captured
First, insert your Windows 7 Boot Disk into your dvd drive and reboot your PC
While the PC is rebooting, you will be prompted ” Press any key to boot from CD…” Just press any key here

Install Windows 7 - Press any key
After you press a key, windows will load installation files.
Install Windows 7 - Windows is loading files
Windows 7 setup will start
Install Windows 7 - Starting Windows Setup
Select your language, time and currency format and keyboard input (US)

Install Windows 7 - First Setup Screen, input language, time and currency format and keyboard input method
Click Install Now to proceed
Install Windows 7 - Install Now Screen
Setup will load for a min or two
Install Windows 7 - Setup is starting
If you do, select I accept the license terms and click Next
Install Windows 7 - License Terms
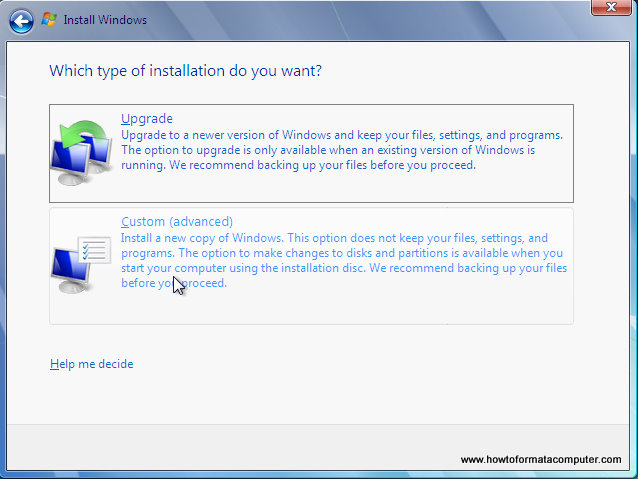
If you are upgrading from Windows Vista select Upgrade, if you had Windows XP you have to select Custom (Advanced). Upgrade from Windows XP to Windows 7 is not available. Click Custom (Advanced)
Install Windows 7 - Custom Install
Select the Partition where you want to install Windows 7 and click Next. You will need at least 5716mb free space
Install Windows 7 - Where do you want to install windows
If you don’t have enough free space to Install Windows 7, you will receive the following warning
Install Windows 7 - Not enough disk space warning message will appear
If that’s the case, you will need to format the partition where you previously had Operating System installed. WARNING: Formatting a partition will erase all existing data on the partition, proceed only if you have backed up all your files!If you want to format the partition, go to Drive options

Install Windows 7 - Drive Options
and format the partition where you want to install windows 7. Again, do this only if you have backed up your documents/files!click format and then yes

Install Windows 7 - Format Windows 7 Install Partition
After you press Next, Windows 7 Installation will begin. Approximately takes about 30 min to 1 hour to finish, depending on your computer speed.
Install Windows 7 - Setup running
After half an hour, setup is complete and windows 7 installation is almost finished. Few more minutes
Install Windows 7 - Setup Complete
Now your computer will reboot, since the Windows 7 DVD boot disk is still in the drive, the message press any key to boot from DVD will appear. We already did that, so this time DO NOT press anything. Just wait 5 sec and your PC will continue booting and finish installing your operating system.

Install Windows 7 - Dont press anything this time
Windows will continue booting and installing, almost there!


Install Windows 7 - Setup is preparing your computer for first use
Finally!Insert your name (this will be your windows username)

Install Windows 7 - Type a username
If you want to, insert password for your computer. ( Hey….you won’t forget it, right? :) )
Install Windows 7 - Type a password
Insert your Windows 7 product key and press Next
Install Windows 7 - Type your windows product key
Do you want Microsoft Updates for your new operating system? It is highly recommend you know…! Select use recommended settings
Install Windows 7 - Use Recommended Settings
It’s time for Time zone, select yours from the drop down menu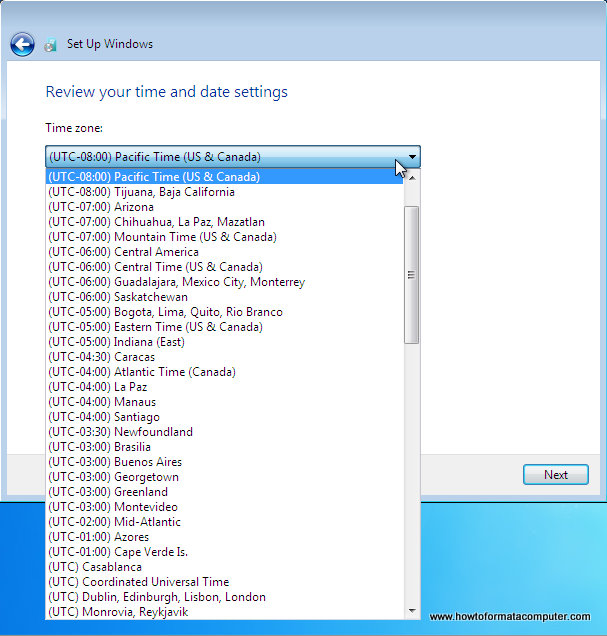
Install Windows 7 - Review your time and date settings
Depending on your location, select the appropriate network location.
Install Windows 7 - Computer location select network
If you have more than 1 computer, type homegroup password for sharing files. Make sure to remember it
Install Windows 7 - Type homegroup password
Windows is finalizing your settings
Install Windows 7 - Windows is finalizing your settings
Can you see the finish line ? Yup, we’re there
Install Windows 7 - Welcome screen
That’s it. Now insert your computer manufacturer drivers CD and install drivers. Also FYI, Windows 7 has great driver support, go to Start –> Control Panel –> Select View By = Small Icons –> Click Windows Update
Install Windows 7 - Windows Update
Check for updates and click on optional updates, to see which drivers windows 7 found for your computer automatically.